#navbar { display: none; }

Tuesday, August 31, 2010

Beef Tenderloin via Sous Vide

Think about starting to marinade medallions about 5 hours before you want to eat!

Ingredients
Beef Tenderloin Medallions (a.k.a Fillet Mignon)
Moore's Marinade
Black Pepper

Special Equipment
Sous Vide
Vacuum Sealer
Cream Brulee Torch

Mise en Place
About an 45 minutes to an hour before you intend to vacuum seal the meat, transfer meat into large ziploc bag and add enough Moore's marinade to coat the surface.  Return to fridge.

Method
Set sous vide for 132 degrees F.  Remove meat from marinade and generously coat both sides of each medallion with fresh ground pepper. Individually vacuum seal tenderloin medallions in plastic bags.  Place bags in sous vide water bath.  Allow to cook for at least 4 hours.

After 4 hours remove plastic bags from water bath and remove medallions.   I transferred the medallions to a cookie sheet coated with aluminum foil.  I then placed a pad of butter on each and hit them with a creme brulee torch to try and do a last minute sear.  It smelled good, but I don't think the technique worked especially well.  I probably won't bother torching them next time. 

Verdict
Awesome.

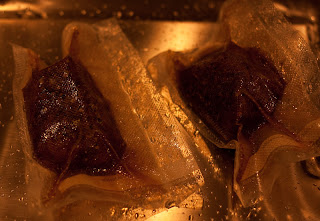
Vacuum sealed beef medallions

Monday, August 30, 2010

Technique: Sous Vide

Sous vide is a fancy French word that means "under vacuum".   The cooking technique gets the name because food is normally vacuum sealed in a plastic bag and then placed in precisely controlled water bath.  Though sous vide has been utilized in high-end restaurants for a few decades, it's a relative new method of cooking available to the home cook.

I'm almost embarrassed to even call this a technique, truth be told it's actually pretty hard to screw up cooking sous vide.  Can you put food in a bag?  If so, congratulation!  You are an expert sous vide practitioner.

The only real skill required for successful results is planning.  Sous vide cooking is slow.  You better be thinking ahead if you want to have food ready at a certain time.  Cooking sous vide can take anywhere from 3 to 24 hours.  As a general rule, the thicker the thing you're trying to cook is, the longer it's going to take to cook.

As a method of cooking, sous vide offers a couple of really impressive benefits.  First and foremost, meat comes out moist and tender.  Like, super tender.  The most tender cut of meat you've ever had (trust me, I'm not over selling this).  That's because you set the water bath to the internal temperature of perfectly cooked meat and plunk the bag in there and wait until the entire cut of meat reaches that temperature.  Have you ever had a 2 inch thick fillet mignon medium rare from edge-to-edge?  I have - it's a transcending experience, truly sublime.

You can't overcook food using sous vide.  While it may take awhile for the contents of your bag to reach your target temperature, there is no way the contents of the bag are going to get hotter than the water bath.  This makes sous vide a pretty forgiving method of cooking.  If you start a bit early and end up leaving your steaks in there for five or six hours instead of four they're still going to come out perfectly cooked.  It's no big deal.

Since the food is vacuum sealed in plastic no flavors get out and no flavors get in.  This is kind of a double edge sword.  Whereas most cooking methods rely on chemical changes at high temperatures to add new flavors to food (a.k.a. maillard reactions), sous vide does not reach high temperatures and therefore gets no benefit from those changes. On the other hand, nothing drips away and is lost either.  Whatever you put in the bag is going to have a long slow intimate cook time with your food.  We're talking truer flavors and literally cooking in their own juices because they got nowhere else to go.

Speaking of the juices.  After cooking meat sous vide there are often juices that are naturally released but captured in the plastic bag.  Under no circumstances should these juices be discarded!  It turns out in addition to tender meat, sous vide makes small quantities of super broth.  Taking a moment to turn these juices into a gravy is a very wise thing to do.  Very wise indeed.

It's not all upside.  Turns out that a lot of food benefits greatly from maillard reactions, so sous vide is not a recommended way to cook everything.  Meat, seafood, and eggs are the most obvious candidates.  However  anything that  benefits from precision might be worth a try via sous vide.

If something is not the same without a bit of searing, you can always do a quick sear after the meat has been cooked via sous vide.  I'm especially interested in what happens when you cook meat sous vide, then chill it back down, and use the searing step to warm the meat back up.  More experimentation is required.

There are a few recipe souces for sous vide dishes, but as of yet, they are not all that extensive - meaning if you get a sous vide you probably should expect to do a bit of your own recipe adaptation and/or inventing.

There is a pretty heavy initial investment in equipment up front.  First you need to buy a sous vide (or a commercial immersion circulater if you got really deep pockets), then you've got to buy some means of vacuum sealing.  These are the two that I have, and thus far, I've been pleased with them:

Sous Vide Supreme
FoodSaver V2240
Cinnamon Pound Cake

Makes two loaf pans worth.

Ingredients
8 oz Butter, room temperature (2 sticks)
2 1/2 cups Sugar
6 Eggs, room temperature
3 cups Flour
2 1/2 tsp Cinnamon, ground
1/4 tsp Nutmeg, ground
1/4 Cloves, ground
1/4 tsp Kosher Salt
3/4 cups Milk

Motivation
I wanted a sweet Cinnamon flavored bread that was dense enough to toast.  This recipe is adapted from an Emeril Lagasse recipe.  I punched up the spices a bit (BAM MotherF’er).

Mise en Place
Pull out the butter and eggs and let them come to room temperature.
In a bowl combine dry ingredients (flour, spices, and salt), whisk together and set aside.

Method
Preheat oven to 325 degrees F.

Fit electric mixer with paddle attachment and cream butter and sugar together until smooth.  Add eggs one at time, beating until just incorporated.  With mixer on low speed alternate adding dry ingredients and milk.

Prepare two loaf pans (I used 9” x 5”) by greasing them with butter (I used Baker’s Joy).  Transfer batter to loaf pans.  Bake until cake test comes out clean, about an hour.

Verdict
Resulting pound cake smells great but is very dense.  Maybe a bit too dense.

Potato Leek Soup (Vichyssoise)

Makes about 1 1/2 Liters of soup.  Took about one hour or so to make.

Ingrediants
3 Leeks
2 Baking Potatoes
1 Small Onion
2 Cloves Garlic
1 tsp Pepper Corns
1 tsp Kosher Salt
1-2 Bay Leaf(s)
Thyme (small bunch)
26 oz Chicken Stock
1/4 cup Heavy Cream
3 tbsp Butter

Motivation
I wanted to make a chilled summer soup.  I remember having an amazing vichyssoise during a wine and food tasting dinner at the late Chef’s Table restaurant.  It was hot outside and the soup was both surprisingly rich and refreshing.  When I looked for recipes I didn’t see many that included onions or garlic, but I like those two ingredients and I don’t really see how they can be out of place in this soup so I decided to go ahead and add them.  As this soup simmers it smells like the antidote for a chilly Autumn afternoon.

Mise en Place
Trim the leeks so only the white bottoms and some of the more tender light green stem section is left.  Halve each leek.  You might want to rinse off the individual layers if they seem like sand or dirt is in between the layers (stupid nature).  Then thinly slice the leeks.  Halve and slice the onions in a similar manner.  Slice garlic.  Peel potatoes then cut into smallish cubes so they will cook faster.


Method
Over mediumn heat, melt butter in the bottom of a pan large enough to hold all the ingredients (I used a small stockpot).  Add sliced leeks and toss in the butter.  Add onions and garlic.  Stir contents occasionally over the next ~5 minutes or so until everything is translucent.

Add potatoes and spices (peppercorns, salt, thyme, bay leafs) to the pot.  I wrapped some butcher’s twine around the thyme so it would be easy to fish out the sticks later (everything else will get pulverized by the blender during the puree step).  Add chicken stock and increase heat to bring to simmer.  Once simmering, reduce heat and let cook until the potatoes are ready to fall apart (30 minutes or so).

Remove thyme and bay leafs then transfer soup to blender to puree.  I was able to get the entire batch into the blender in one go.  You might want to try two batches if you don’t trust your blender-fu.  Alternatively, you can probably use an immersion blender and puree in the pot.  I ended up blending it until the peppercorn pieces got acceptably small and the soup looked homogeneous and velvety.

Finish soup by folding in 1/4 of heavy cream.  I tasted the soup before adding heavy cream and I’m not entirely sure the soup actually needs the heavy cream.  It tasted pretty awesome.  If it was chilly outside I’d probably just serve the soup as is.  Eventually, I decided to add the cream with the expectations that it might sweeten up the soup slightly and add a certain something once the soup was chilled.  To help chill the soup I poured the soup into a mixing bowl nested in a larger mixing bowl filled with ice water.